Parse & Log Barcode Scanner Data with Timestamps To File
Task:
If I am scanning some barcodes, it keeps writing to the log file in a single row. My question is, can we have this as after it reads one data packet, it should write the next data packet to the next line instead of writing the data in a continuation, or it adds some character or space in between each data packet received. So that we can differentiate between each data packet.

Fig.1. Barcode scanner
data captured by the serial
data logger software
Requirements:
- Data Logger Suite Professional, Enterprise, or a trial version;
- ASCII Data Query and Parser
- DDE Server
It is assumed that:
You've configured communication parameters (baud rate, the number of data bits, flow control, etc.) in the data logger and can receive any data without communication errors.
Solution:
The figure above shows that the data flow is very simple. Each record has a fixed size and a fixed position of each data item. The data record doesn't contain non-printable ending characters of each data record but contains constant characters of each reading. It is clear that a data reading (in a red rectangle) begins with 0006 and ends with 00001 (in green rectangles).
Now, we are ready for configuring modules. First, please, select the "ASCII data parser and query" plug-in (fig.2, pos.1) from a drop-down list. Then, enable a parsing option for data received (fig. 4a, pos. 2).
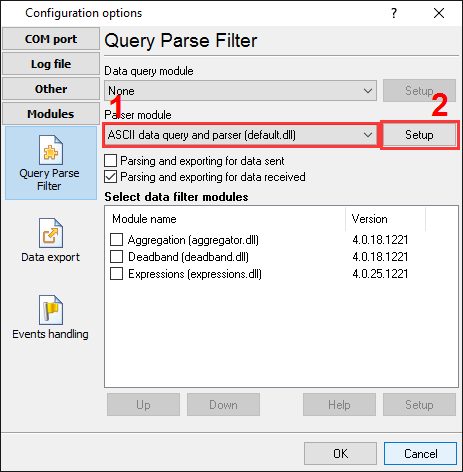
Pic.2. Barcode scanner data logger. The data parser plug-in.
Now, please, open a configuration window of the ASCII parser and query plug-in (click the "Setup" button near a drop-down box fig.2, pos.1). The dialog window will appear on the desktop (fig.3).
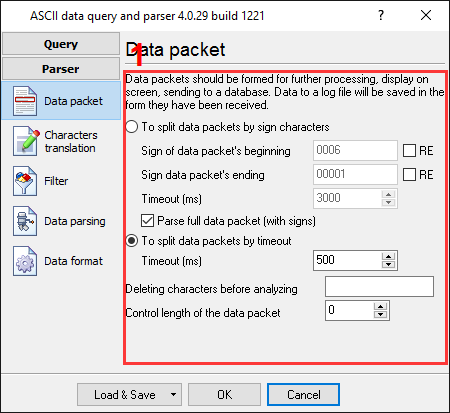
Fig.3. Barcode scanner data logger. The configuration window of the parser.
The configuration process will be very simple if you've examined your data flow in the data logger window (fig.1). You should type in the same as in the data logger window in fields 1 and 2. Field #1 marks the beginning of the data block, and field #2 marks the end. You should type value from the fig.1, which is underlined by green.
But if a data record doesn't contain start and end markers, you can split the data by timeout. We've selected this method (fig.3 pos.3), because start and end markers may be changed later.
Because the barcode scanner doesn't send date and time stamp to the port, we can add it on the computer side. Simply activate the "Add date/time stamp" option (fig.3 pos.4).
Other options are not applicable in our case, because we write data to a log file only and don't export it to a database or Excel.
We are now ready to configure the log file settings. First, select the "Log rotation" page and activate log files for received data (Fig.4, pos. 1). Then, enable writing to a file after parsing and date and time stamping for data received (Fig.4, pos. 2, 3).
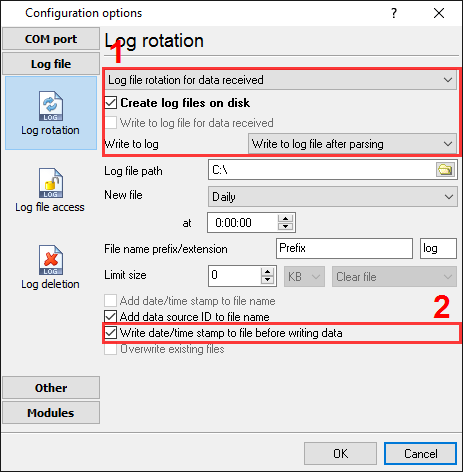
Fig.4. Barcode scanner data logger. The log file settings.
You may change other options (prefix, extension, new file creation mode) as you want. It isn't important in this example.
The next tab is a very important part of the configuration (Fig.5). The program uses this information while writing or outputting a date/time stamp to a file or on a screen. In the example, we've enabled writing for date/time stamps to a log file after parsing (Fig.5, pos. 1, 2). Because we need to split each data record to a different line in a file, then we've added line feed characters #0D#0A to the stamp prefix. These characters are equivalent to CR+LF characters in a text file.
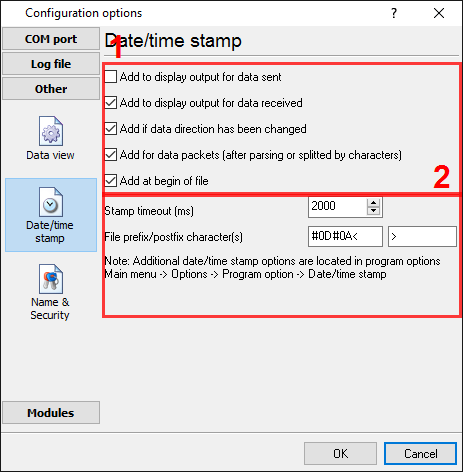
Fig.5. Barcode scanner data logger. The date/time stamp settings.
Click the "OK" button to close the options window.
Additionally, you may define the format of a date/time stamp, which will be written to a file.
Please, select the "Options → Program options" menu item and then select the "Date/time stamp view" page (Fig.6).
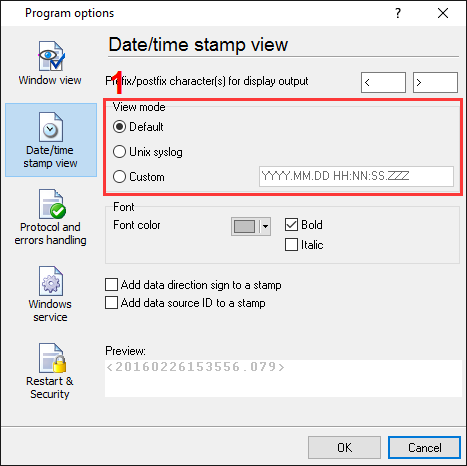
Fig.6. Barcode scanner data logger. The date/time stamp view settings.
Some options are applicable for display output only, but the "View mode" radio-group allows you to configure the date/time stamp's format. For a detailed description of formatting characters, please, see the help file.
Click the "OK" button to close the options window.
Okay, all settings have been completed, and we are ready to capture barcode data to a log file. A part of a log file is displayed in the figure below.
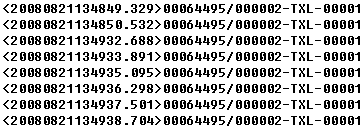
Fig.7. Barcode scanner data logger. Result.