
Database to OPC: The OPC server for reading data from the database
The OPC server for reading data from the database
Problem:
We need to get data from the database and present them as an OPC server.
Option 1: One column in the database table contains the name of the tag group, the second column contains the first value of the group, and the third column contains the second value of the group.
Option 2: One column in the database table contains the name of the OPC tag group, the second column contains the tag name, and the third column contains the tag value.
Terms of reference:
To solve the problem, we are going to use Data Logger Suite Enterprise or its trial version. All the necessary modules are provided with the main program. You don’t need to install anything else.
Step 1: Configure data reading from the database
1. You need to create a new configuration with the "SQL interface" data source. To do it, click the green-plus button in the main window of the program; when a dialog box appears, select "SQL interface" (figure 1).
2. Configure the database connection settings (figure 2).
3. Enter the name of the database table or write an arbitrary SQL query (figure 3).
4. Specify the frequency of data reading from the database.
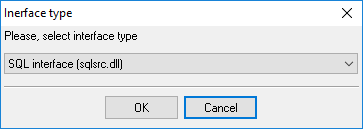
Figure 1: Adding a data source
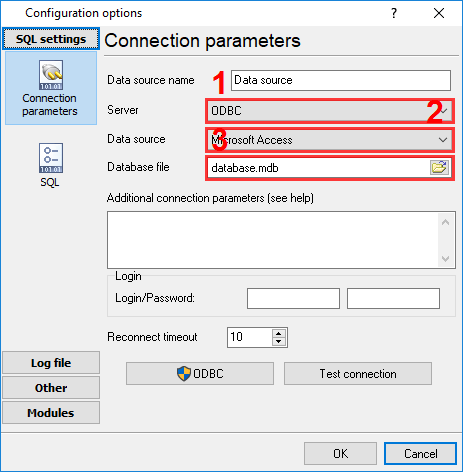
Figure 2: Configuring the database connection
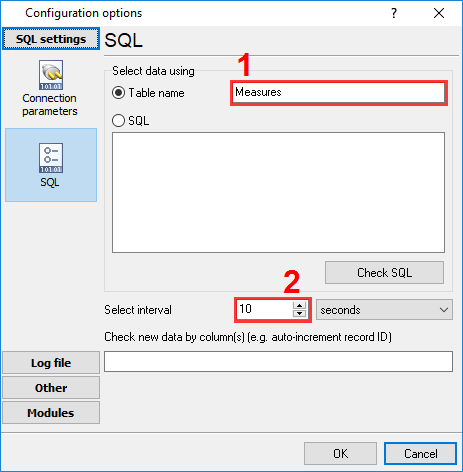
Figure 3: Configuring the SQL data source
Step 2: Configure data exporting to the OPC server
2.1 Go to the "Modules - Query Analysis Filtering" tab (figure 4) and select "OPC parser" in the drop-down list.
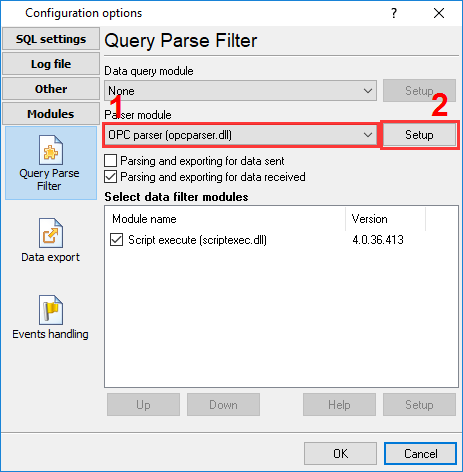
Figure 4: Selecting the parser
2.2 Go to the “Modules - Data export” tab (figure 5) and check the checkbox next to "OPC server" in the list.
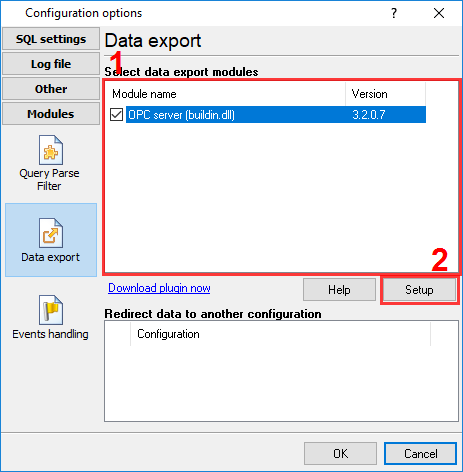
Figure 5. Selecting the data export module
2.3 Double-click the "OPC server" module name; when a dialog box appears, select "Ungrouped", click "OK" (figure 6).
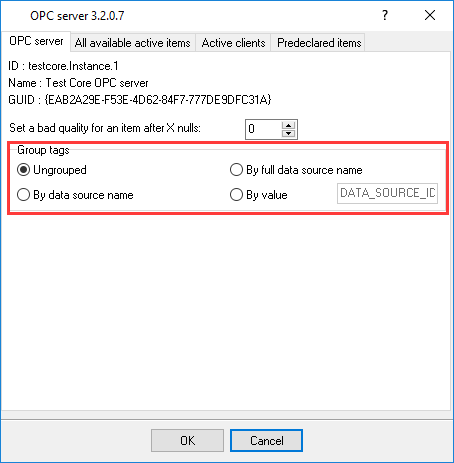
Figure 6: Disabling data grouping
Step 3: Changing the data presentation format
By default, the program uses the name of the column in the database table as the OPC tag name. So you need to add a small script to convert the data to the necessary format.
3.1 Go to the "Modules - Query Parse Filter" tab (figure 7) and check the checkbox next to "Script Execute" in the data filtering modules list.
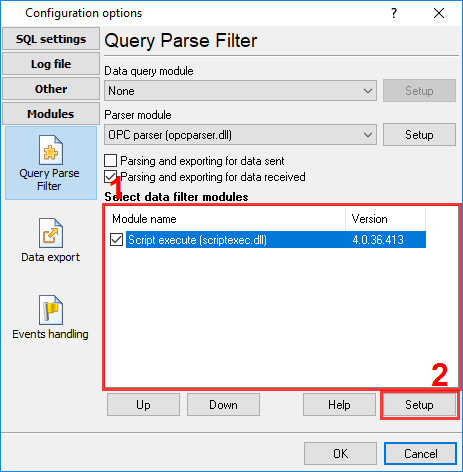
Figure 7: Selecting the data filter module
3.2 Double-click the "Script Execute" module name; when a dialog box appears, copy the script (see below) and paste it into the text entry field in the dialog box. You need to change the values of the following variables: sColName, sColValue1, and sColValue2. Specify the names of the columns that contain the tag name, the first value, and the second value, respectively (figure 8).
Script for Option 1
var v:double;
    strName: string;
    sColName:string = 'ItemName';
    sColValue1:string = 'VolAll';
    sColValue2:string = 'LevelAll';
begin
 // checks a variable in a data packet
 if IsVariableDefined(sColName) then
  begin
    strName := GetVariable(sColName);
    // first value
    if IsVariableDefined(sColValue1) then
     begin
      v := GetVariable(sColValue1);
      SetVariable(strName + '.' + sColValue1, v);
     end;
    // second value
    if IsVariableDefined(sColValue2) then
     begin
      v := GetVariable(sColValue2);
      SetVariable(strName + '.' + sColValue2, v);
     end;
  end;
end.
Script for Option 2
var v:double;
    strName: string;
    sColName:string = 'ObjName';
    sColName2:string = 'TagName';
    sColValue1:string = 'LevelAll';
begin
 // checks a variable in a data packet
 if IsVariableDefined(sColName) and IsVariableDefined(sColName2) then
  begin
    strName := GetVariable(sColName) + '.' + GetVariable(sColName2);
    // value
    if IsVariableDefined(sColValue1) then
     begin
      v := GetVariable(sColValue1);
      SetVariable(strName + '.' + sColValue1, v);
     end;
  end;
end.
|
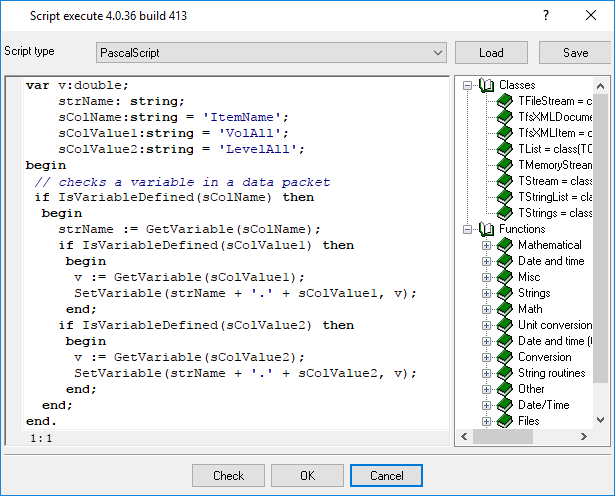
Figure 8: The script
3.3 Click "OK" and close the "Script Execute" window.
3.4 Click "OK" in the remaining window and save all the settings.
Done! Now you can use the OPC client to connect to the dataloggersuite.Instance.1 OPC server and check the result.
Step 4. (Optional) Declare the OPC tag name list
By default, the OPC server generates the tag list only after reading the tags from the database. So if the OPC server is launched by the OPC client, the server may not have enough time to read the data from the database and generate the tag list when the OPC client requests it.
To avoid this problem, you can declare all tag names on the OPC server in advance.
4.1 After configuring the program, wait for the data to be read from the database.
4.2 Go to the "Modules - Data export" tab and double-click the "OPC server" module name (you have already enabled this module).
4.3 When a dialog box appears, select the "In advance" tab and click the "Import all" button. All tag names will appear in the list. Click "OK" in all windows and save the settings (figure 9).
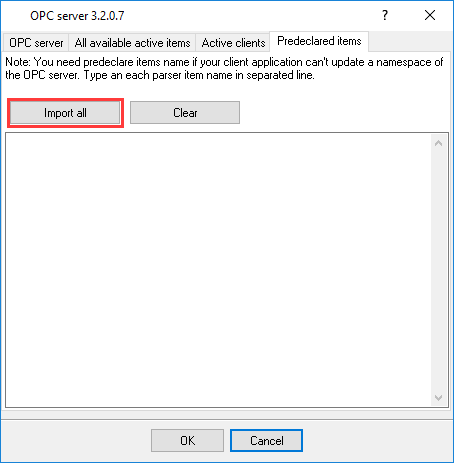
Figure 9: The tag name list
The Microsoft Access database file used in this example you may download here.
You may download the backup copy of this configuration here and restore from the "File" menu in the main window.